Using the Travel Reimbursement
This page briefly explains how to complete a basic Travel Reimbursement in KFS. Your department or school may have policies or procedures that pertain to processing these reimbursements, and should be followed if applicable. We recommend filling out the Trip Overview tab first, then filling out the rest. Remember to consistently save your work.
Contents
- How to access the TR eDoc
- Document Overview Tab
- Trip Overview Tab
- Trip Information Section
- Image Scanning Tab
- Daily Expenses Tab
- Actual Expenses Tab
- Travel Expense Total Tab
- Special Circumstances Tab
- Accounting Lines Tab
- Payment Information Tab
- Pre-Disbursement Processor Status Tab
- Notes and Attachments Tab
- Ad Hoc Recipients Tab
- Reports Tab
- Creating Multiple TRs for Same Trip
How to Access the Travel Reimbursement (TR) eDoc
You can access the TR from ZotPortal. The link is under the Travel and Event Management Portlet.
- Go to ZotPortal and log in.
- Find and select the Finances/KFS tab in the yellow menu bar at the top of the page.

- Find the Travel and Event Management Portlet.
- Expand the Transactions menu by selecting the plus (+) sign.
- Click on the Travel Reimbursement link to begin a new reimbursement.

Document Overview Tab
- The Description field should be left blank. It will auto populate with the payee's name after the document is saved.
- Be sure to enter a detailed explanation into the Explanation filed as it is required by policy.

Trip Overview Tab
- Use the Traveler Detail Type radio buttons to choose a payee type. For more information on types of payees, please see our About the Travel Reimbursement page.
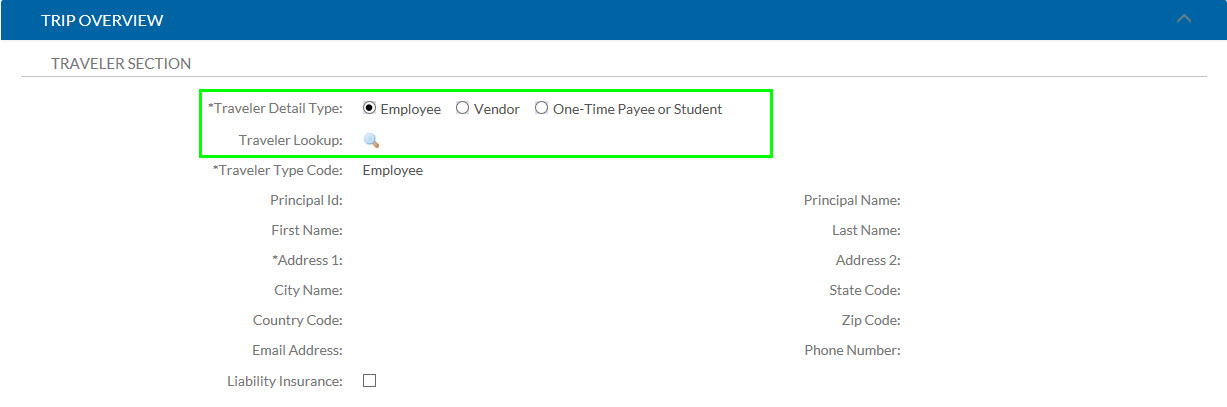
- Select the Traveler Lookup icon to choose the traveler being reimbursed.
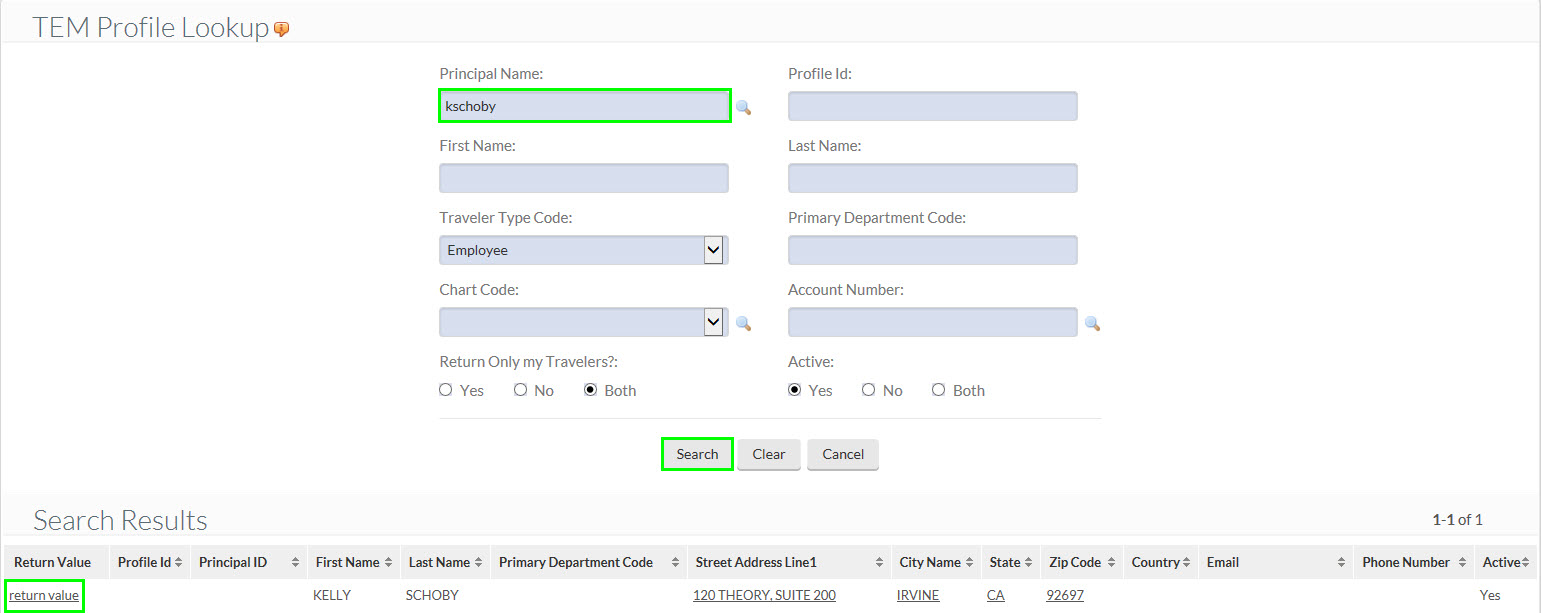
- If Employee is selected for the Traveler Detail Type, the TEM Profile Lookup screen will open. In the TEM Profile Lookup, you will only be able to find people that you are an arranger for. Our TEM Profile FAQ page and Creating a TEM Profile page have helpful information on TEM Profiles and selecting employee payees.
- If Vendor is selected, the Vendor Lookup screen will open.
- If One-Time Payee or Student is selected, you must manually enter the payee's information
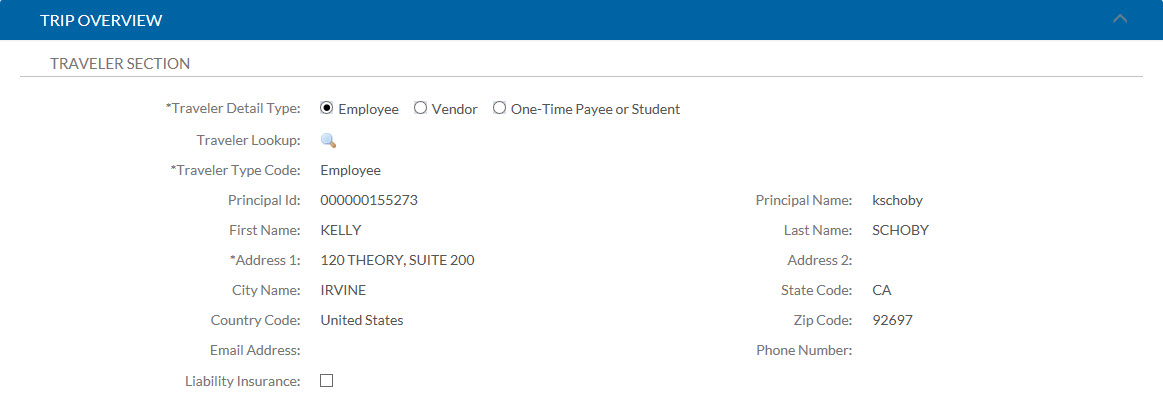
- For employees and vendors, you can find your payee by entering search criteria and then clicking the search button. The payee's information will be populated into the document after the return value link is clicked.
- The Liability Insurance box must be checked if the reimbursement eDoc is paying mileage.
Trip Information Section
The bottom half of the Trip Overview tab is the Trip Information Section. This section requires more detailed information to be entered regarding the trip.
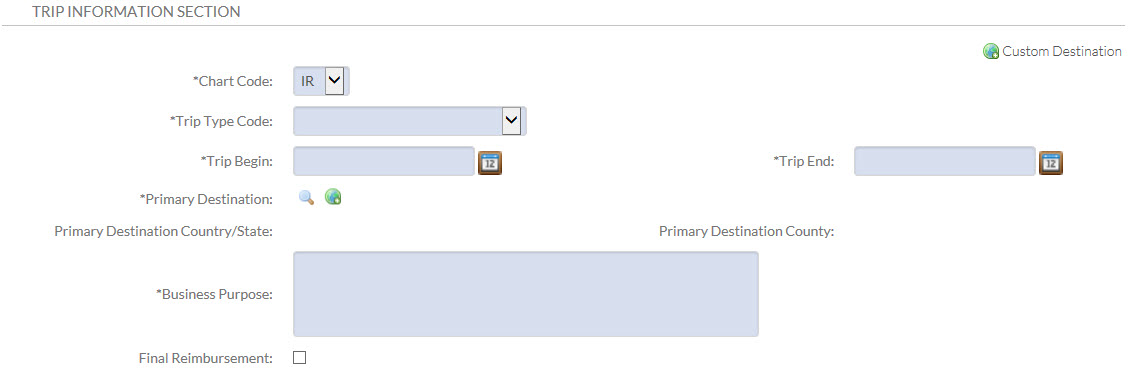
Chart Code
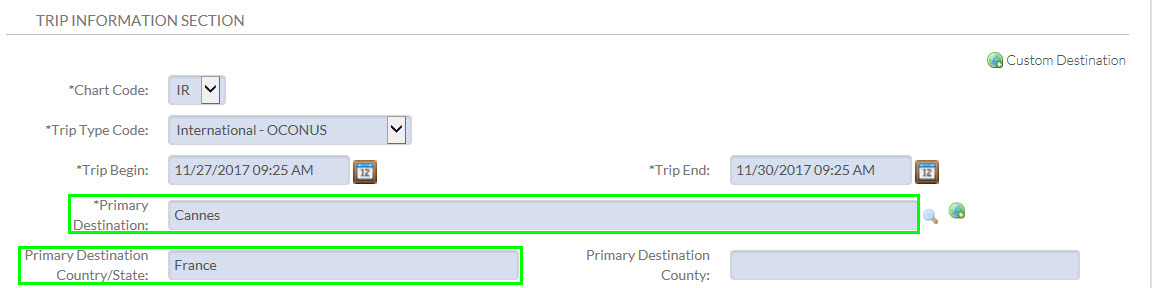
The Chart Code will populate based on the initiator's Primary Department Code. The Chart Code in the Accounting lines must be the same as the Chart Code in the Trip information Section.
Trip Types
- In-State: Travel from one California City to another California city.
- International-Oconus: Travel from Irvine to an International Country OR Travel From an International country to Irvine.
- Out of State-Conus & Oconus: Travel to a US State or Territory
Tip: CONUS stands for "Contiguous United States" and includes the lower 48 states. OCONUS means "Outside the Contiguous United States" and includes Hawaii, Alaska, other territories under the control of the United States, and all international destinations.
Trip Begin and End Dates
Trip Begin and Trip End dates are selected by clicking on the date selector and clicking on the appropriate dates.
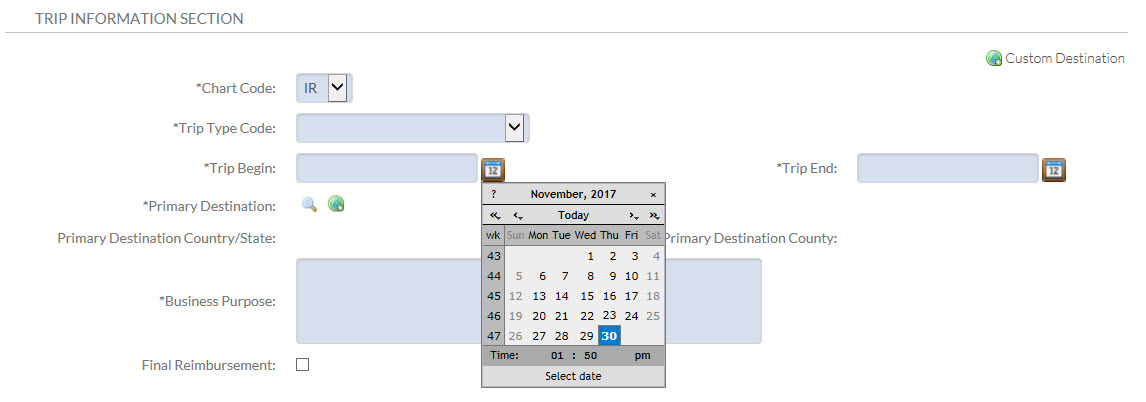
- Click on the ">" symbol to change the month and the ">>" option will change the year.
- The symbol "<" will change to the previous month and "<<" will change to the previous year.
- The "x" symbol with remove the calendar.
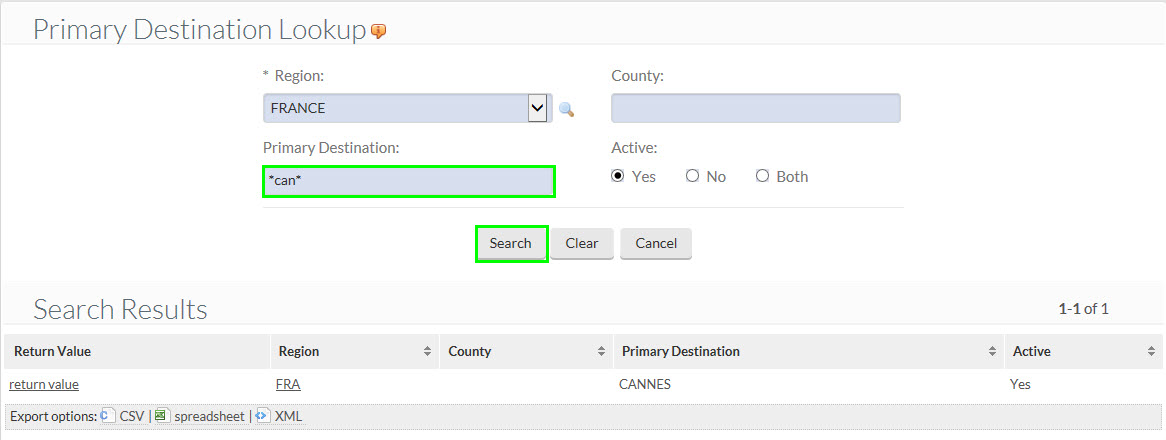
The Primary Destination lookup
The Primary Destination lookup should be used to find the City that is the Traveler's destination.
- When selecting Hawaii, Alaska or a US Territory as the Primary Destination, the Trip Type should always be Out Of State – Conus & Oconus. The City should be chosen in the Primary Destination lookup.
- Hawaii, Alaska and the US Territories are coded as Oconus and will prompt the document to allow Per Diem to be added as an expense. Choosing "International" as the trip type for these destinations will cause them to show as Conus and adding Per Diem expenses will trigger an error.

- To choose a Primary Destination, select the Primary Destination Lookup icon.

- The Trip Type will populate the Trip Type that was chosen in the previous screen.
- The Country State drop down displays US States and territories first, then international countries.
- The County field allows you to enter a US County.
- The Primary Destination field is where cities can be entered.
Tip: Using special characters can help your search. In this example *CAN* was used to find Cannes. Using the asterisks on both sides of "CAN" tells the lookup to find any Primary Destination that contains "CAN".
Destination Not Found: The "destination not found" option should be used only in following cases:
- The destination cannot be located as described in the search.
- When a traveler is traveling from outside the Continental United States.
- Choose Trip Type: International
- When a traveler is traveling from another state to California
- Choose Trip Type: Out of State
To manually enter a Primary Destination, select the "destination not found" button. The destination not found button appears as a globe icon.

Manually type in Destination information.
Business Purpose
A Business Purpose is required and can be the same information that was entered into the Explanation field.
Image Scanning Tab
There are currently 3 options on uploading supporting documentation relating to the reimbursement. For more information on what supporting documents are required, see the Reference Guide.
The maximum allowable attachment size is 5MB. PDFs or simple Excel document types (.csv, .xls, .xlsx) are allowed.
Option 1: Upload supporting documentation
Follow these steps to upload your supporting document images to FileNet:
- Upload is not available until the document has been saved, submitted, or blanket approved.
- Before you upload any images, make sure that any sensitive or personal data is redacted. Files cannot be deleted after they are uploaded.
- Scan or photograph your documents into one of the following file formats: .pdf, .jpg, .jpeg, .bmp, .png, .tiff, or .tif.
- Go to the Image Scanning tab and click the Browse button to select the image from your computer.
- Click the Add button to upload your image to FileNet. No cover sheet is needed.
- The Notes and Attachments Tab should never be used to upload supporting documentation items to a TEM or DV e-document. Sensitive or personal information cannot be redacted or removed once uploaded in the Notes & Attachments tab
Option 2: Link to scanned information on another document
If your supporting documents were scanned into a previously completed TEM e-document that was subsequently disapproved, link that disapproved eDoc to the new one you are creating. Enter the document number of the disapproved document into the Scanned Document Number field in this section.
Option 3: Central Scanning
After the TR or ENT document has been saved, select the link in this section to print an automatically generated coversheet. All supporting documents should be clipped to it. Send the cover sheet and supporting documents to Central Scanning. The e-document will be placed in a "scanning hold" until after documents are uploaded to FileNet by Central Scanning.
You can find more information on Image Scanning by clicking on the flowing link:
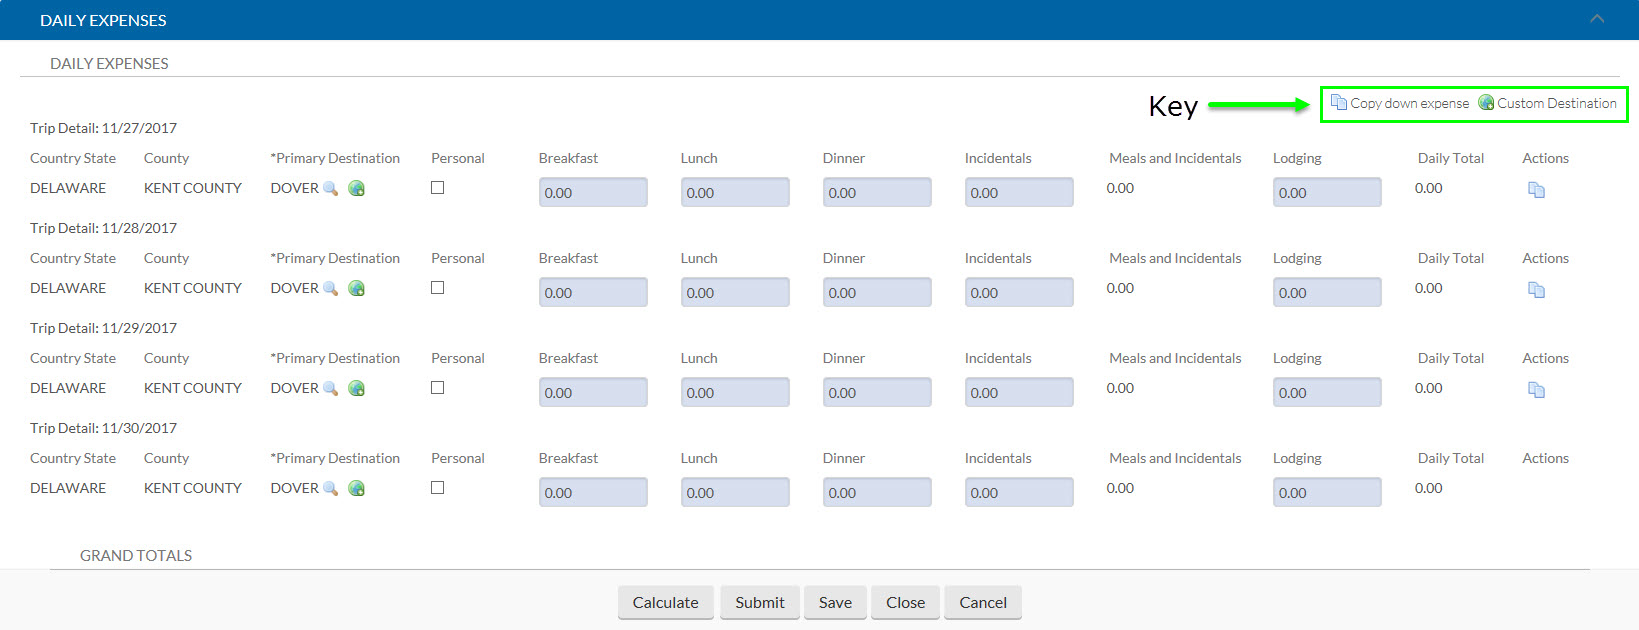
Daily Expenses Tab
Daily Expenses tab provides a breakdown of individual meals, incidentals, and lodging expenses for each day of a trip. The system will populate this tab after the preparer selects the Create Daily Expenses icon. The location and dates for each day are automatically populated by the system based on the primary destination and the travel beginning and ending dates entered in the Trip Overview tab. The dates cannot be changed, but the location can be edited for each day by selecting the magnifying glass lookup icon next to the primary destination.
- The Trip Overview tab must be completed for the Daily Expense tab to appear.

Domestic Daily Expenses
Domestic Primary Destinations will prefill all fields with zero values to prompt the preparer to fill out the fields with actual expenses for those items.
There is a Key in the upper right corner of the Daily Expenses tab. The Key lets users know what the Copy down expense and Custom Destination buttons look like. The Copy down expense and Custom Destination buttons can be found in the expense lines.
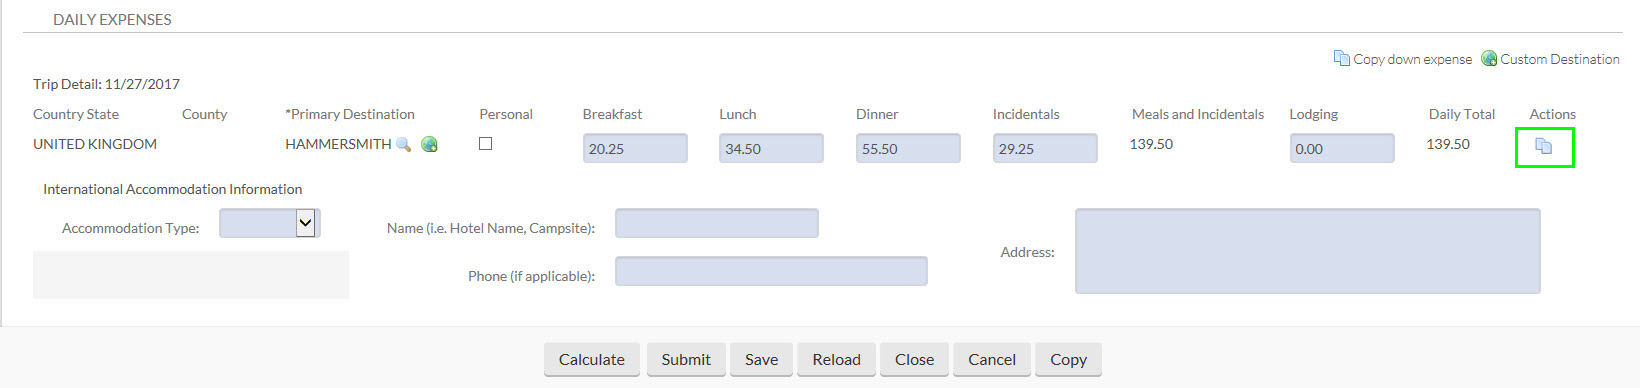
International Daily Expenses
International Primary Destinations will prefill all fields with the current Federal Per Diem rates. TRs for international travel also require preparers to fill out the International Accommodation Information section for each day of the trip. If you select the Personal checkbox, the amounts are zeroed out for that day.

Copy Down Button
The Copy Down duplicates the destination and amounts entered in each field of the selected date to the days listed below. If you select the Personal checkbox, the amounts are zeroed out for that day.
Update and Remove Daily Expenses
Selecting the Update Daily Expenses button recalculates the totals for each day and the Grand Totals section. Selecting the Remove Daily Expenses button removes the entire Estimated Daily Expenses table. Users can reselect the Create Daily Expenses icon to fill in the table again.

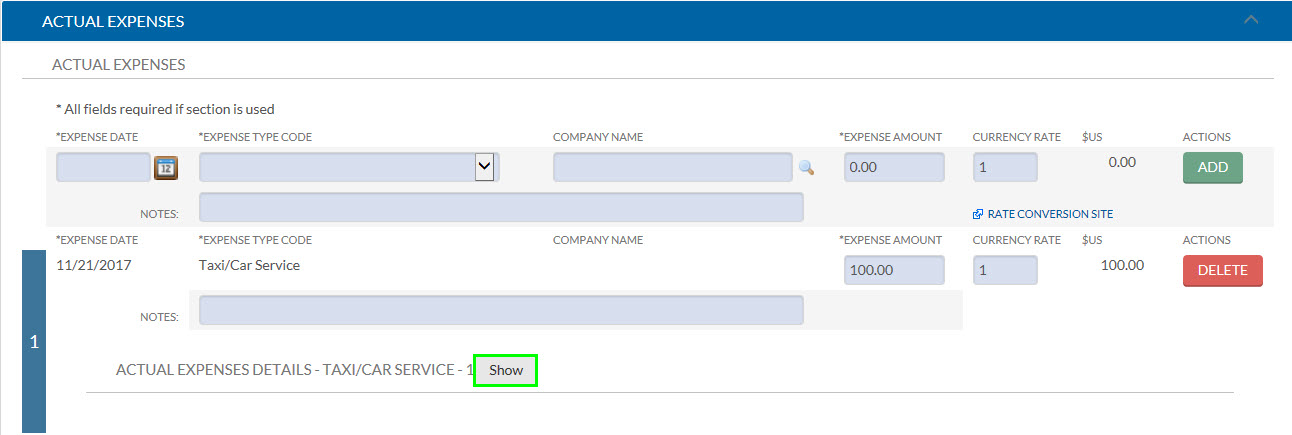
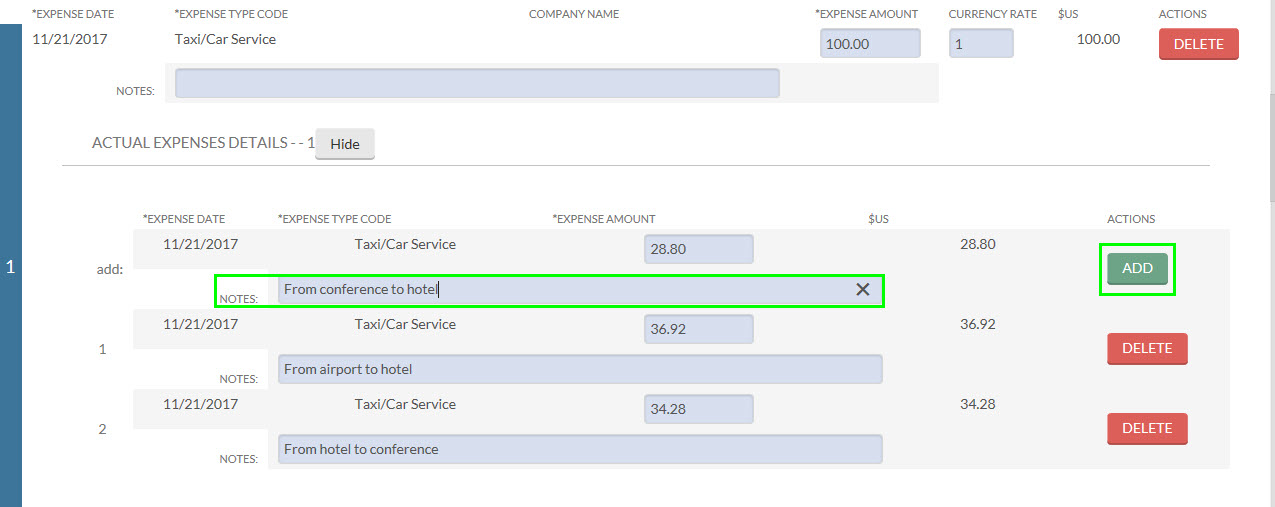
Actual Expenses Tab
The Actual Expenses tab is where users can provide details on the expenses relating to the travel that need to be reimbursed. Once an expense has been added, a new blank line appears. KFS will only allow you to enter one expense type line per day. Users can further break down receipts, if desired, underneath the Expense Type/Date, by expanding the Actual Expense Details.
- Step 1:; Enter the Expense Date, Expense Type, and the total amount of all (in this example there are three) receipts. Them select the add button.

- Step 2: Select the "show" button under the Notes field.
- Step 3: Enter the amount of the first receipt, then select the "add" button.
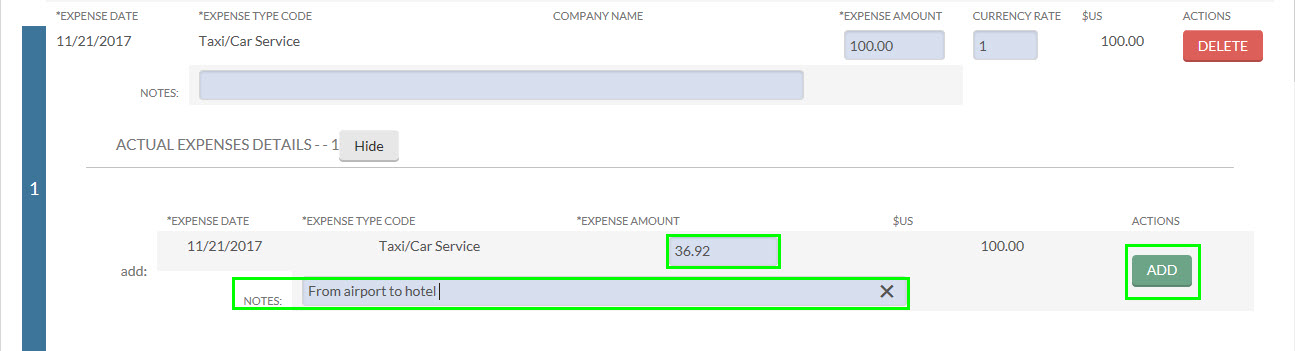
- Step 4: Once the first line is added a new line will appear above it with the balance of the total amount. Change the amount to the amount of the second receipt.

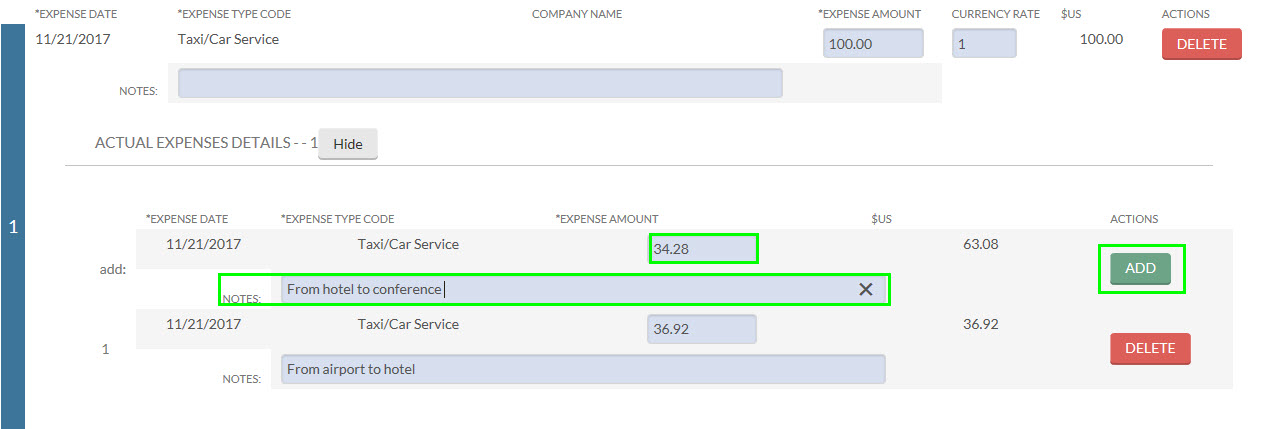
- Step 5: Add the third expense and select the "add" button
CTS and Corporate Card charges can be imported and reconciled by selecting the Look Up/Add Multiple Imported Expense Lines icon.
Travel Expense Total Tab
The Travel Expense Total tab provides a summary of expenses.
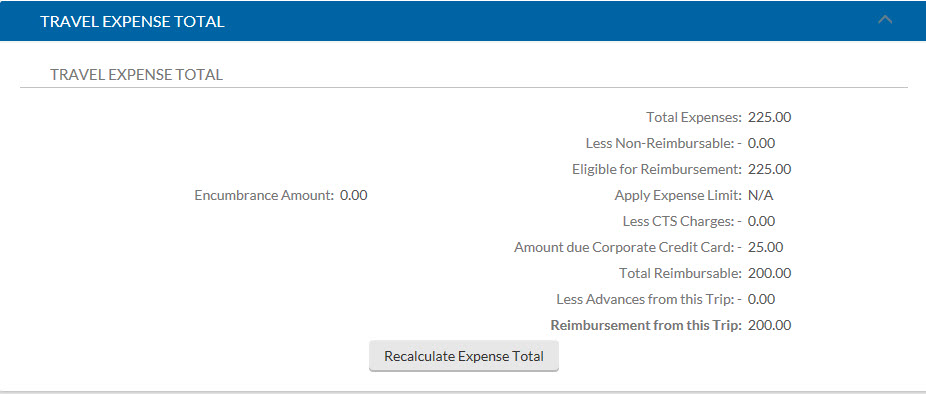
- Total Expenses: The total amount of expenses that have been entered into the TR document
- Eligible for Reimbursement: The total amount of reimbursable expenses in the TR document.
- Less CTS Charges: This expense is when a CTS card was used for air or lodging booked and charged on behalf of the traveler. This is not reimbursed to the traveler.
- Total Reimbursable: This amount is what will be reimbursed to the traveler for their out of pocket expenses.
- Reimbursed from this Trip: Total paid to the traveler.
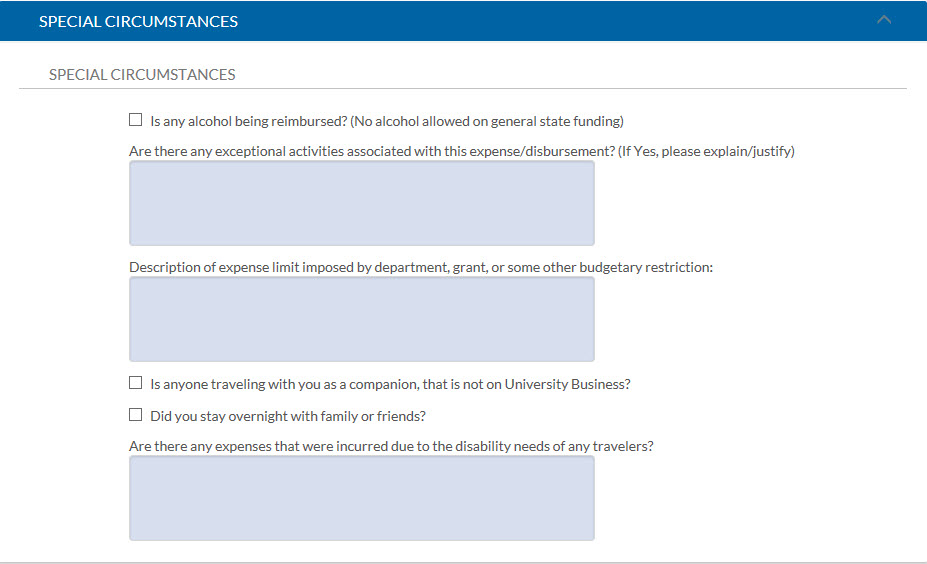
Special Circumstances Tab
The Special Circumstances tab includes key questions that may be asked by Accounts Payable reviewers. The question(s) should be answered and boxes checked ONLY if it pertains to the Travel Reimbursement. If not applicable, leave the section blank.
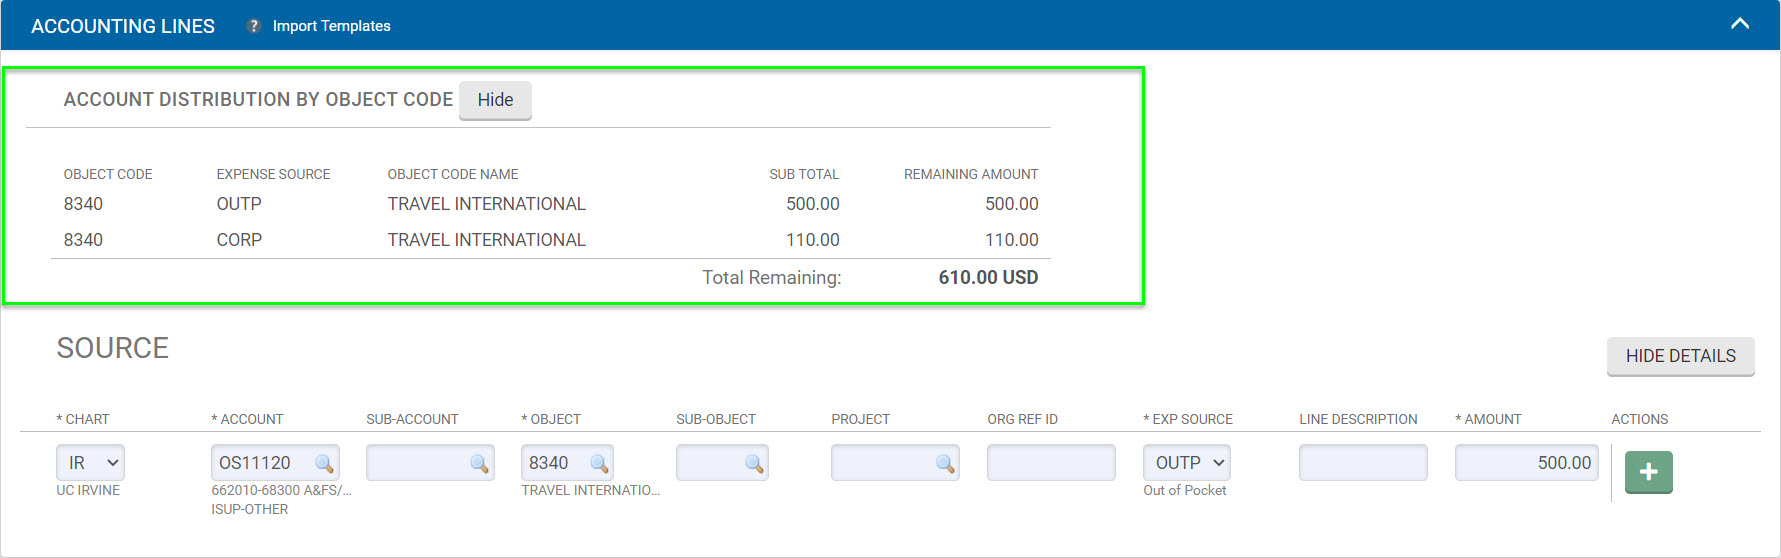
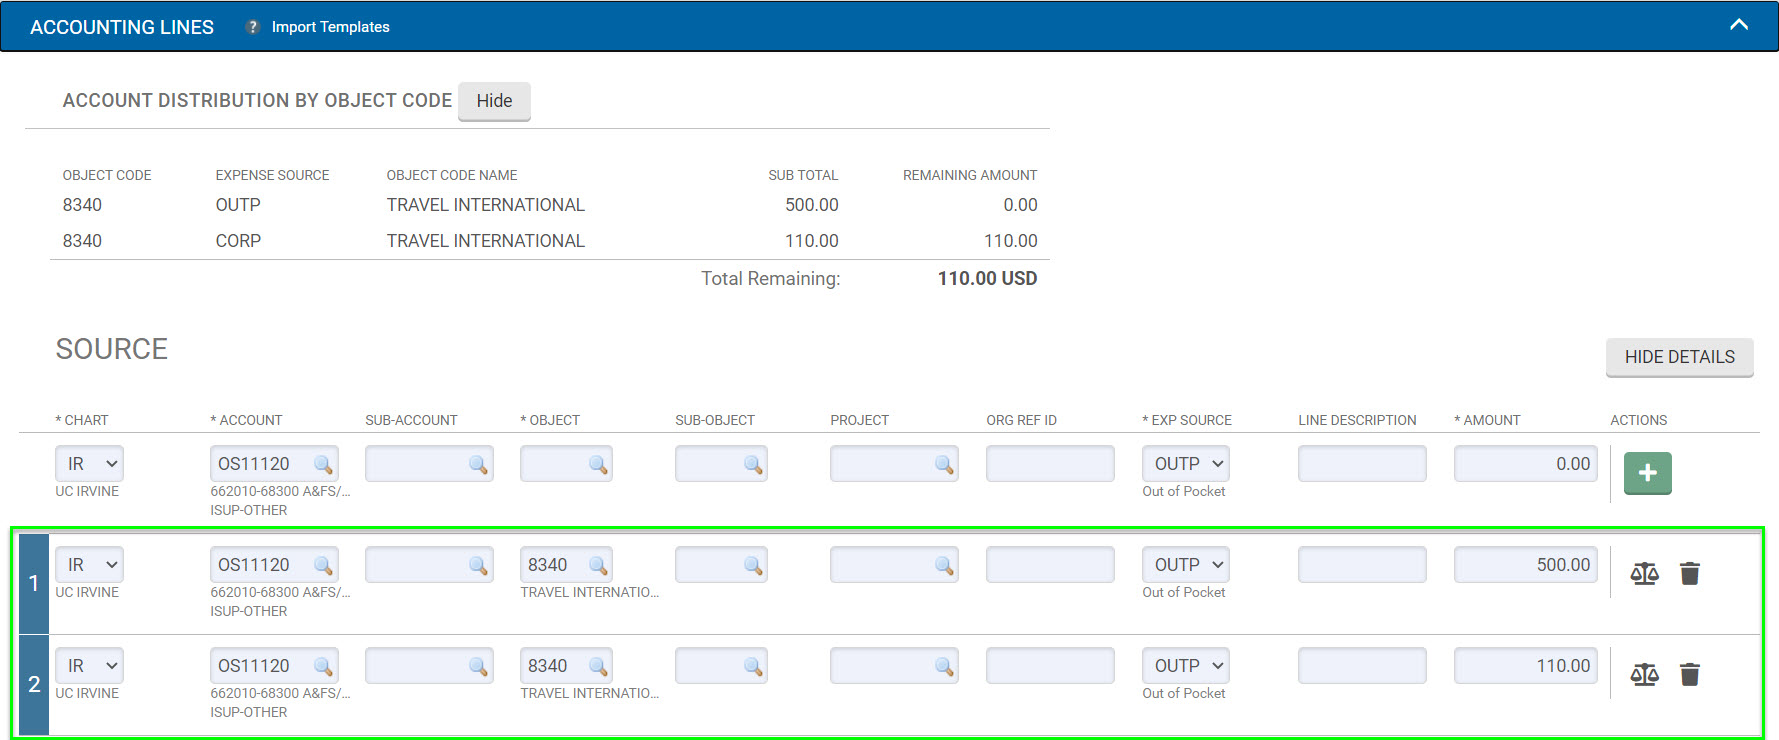
Accounting Lines Tab
Account Number, Object Code, Expense or Encumbrance, and Amount are required fields. Check the Account Distribution by Object Code section to see how the Object Code and Expense or Encumbrance fields should be completed. The add button must be selected for an accounting line to be added.
Each accounting line has a Line Description field. Information entered into the Line Description field will show as the document description on the General Ledger. If the Line Description is left blank, the General Ledger will show the description that appears in the document overview tab.
The Account Distribution by Object Code section of the “Accounting Lines” tab lists the acceptable KFS Object Codes to be used for this reimbursement. These object codes were determined by the expense types identified in the Actual Expenses tab. No other Object Codes may be used on this eDoc, and users will get a warning/error if they try to input a different object code in the Accounting Lines.
Payment Information Tab
Payment Method
The Payment Method drop down allows you to choose how the payee receives payment. In almost all cases, you should select P- Check/ACH (EFT). With this option selected, the payee will either:
- Receive a check sent to the address in the Traveler Section of the Trip Overview tab or
- Receive a direct deposit (ACH and EFT stand for direct deposit).
The Wire Transfer (Foreign BANK Only) option can be selected if the payee does not have a bank account in the U.S. Reimbursement payments may be sent via foreign banks in U.S. dollars or in foreign country currency to individuals or to vendors.
Individuals must submit the completed and typed, Wire Transfer Request form. The completed form is required documentation and must be uploaded to the image scanning tab of the reimbursement.
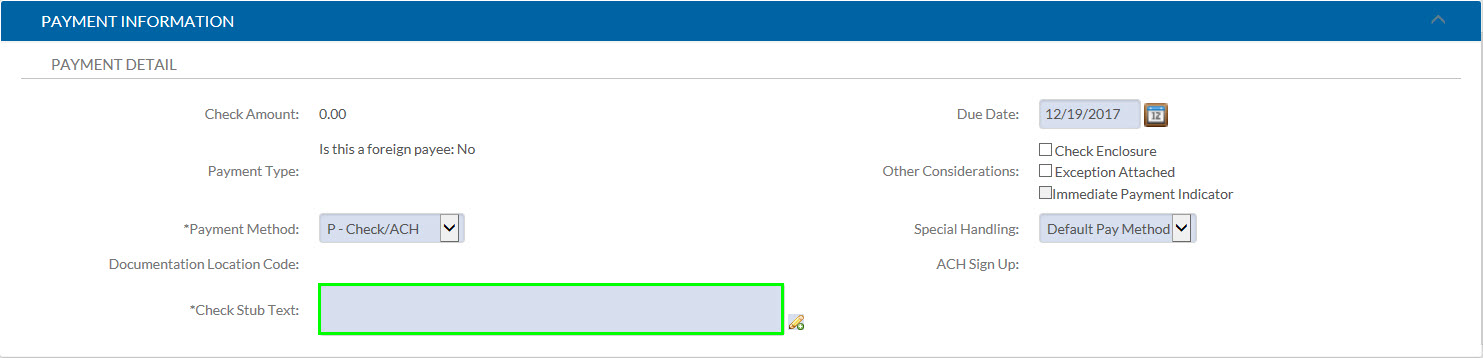
Check Stub Text
The Check Stub Text will be printed on the payee's check. When paying a vendor, it is very important to type in details in the Check Stub Text field:
- Invoice number and invoice date – department will receive the vendor invoice
- Name of the event as listed on the vendor invoice or contract
- Date of the event
- Amount due
- Include vendor contact name if listed on the contract: Sales Manager, Event Coordinator, etc.
Special Handling
When creating a Travel Reimbursement e-document in KFS, users can select three special check handling options. You can enclose additional documents with a check, print a check for pick up at Financial Services in Aldrich Hall, or force a check to be printed when the payee has ACH direct deposit set up.
- Enclose additional documents with a check (i.e., invoice, letter).
- Print a check for pick up at Financial Services in Aldrich Hall.
- Force a check to be printed when the payee has ACH direct deposit set up.
Please see Accounts Payable's Check Enclosures and Special Handling Guide for more information.
When creating a Travel Reimbursement e-document in KFS, users can select three special check handling options.
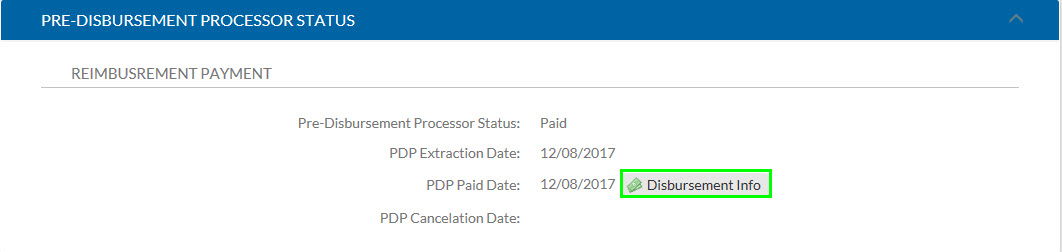
Pre-Disbursement Processor Status Tab
Users can open the Pre-Disbursement Processor Status tab in the ENT eDoc to see if the check has been extracted, cleared, or the deposit has been sent.
Check Stub Text
The Check Stub Text will be printed on the payee's check. When paying a vendor, it is very important to type in details in the Check Stub Text field:
- Invoice number and invoice date – department will receive the vendor invoice
- Name of the event as listed on the vendor invoice or contract
- Date of the event
- Amount due
- Include vendor contact name if listed on the contract: Sales Manager, Event Coordinator, etc.
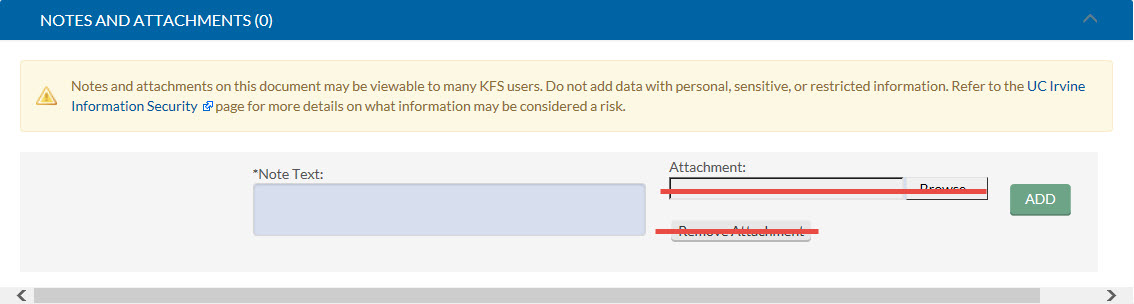
Notes and Attachments Tab
Additional information regarding the reimbursement may be added to the TR or ENT document at any time in the Notes & Attachments tab.
The maximum allowable attachment size is 5MB. PDFs or simple Excel document types (.csv, .xls, .xlsx) are allowed.
- Type information in the Note Text field
- Click on the "add" button.
Notes and attachments on this document may be viewable to many KFS users. Do not add data with personal, sensitive, or restricted information. Refer to the UC Irvine Information Security page for more details on what information may be considered a risk.
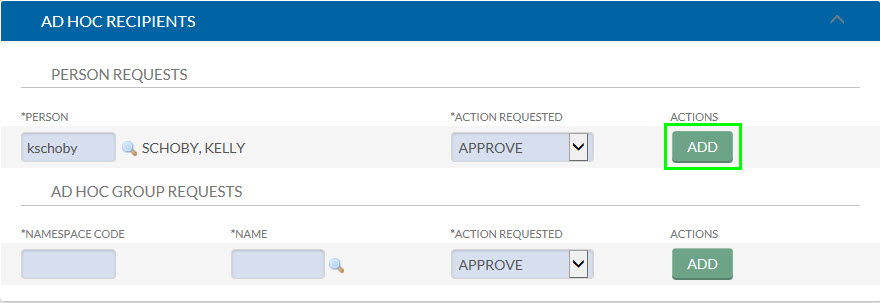
Ad Hoc Recipients Tab
The Ad Hoc Recipients tab allows users to add a person or group to the normal workflow of a KFS document. Users can select whether they want a Person or Group to ad-hoc a request by looking up the Person or Group Name and them clicking the ‘add’ button when done.
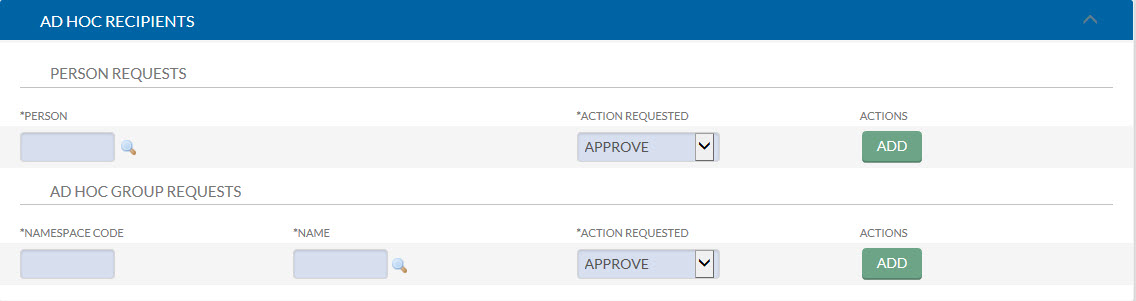
Person Requests
Users can add individual employees to the routing of the TR document for exceptional approval. Only employees who have Role 54 in KSAMS can receive an approval request via Ad Hoc routing.
- Select the magnifying glass next to the *Person field
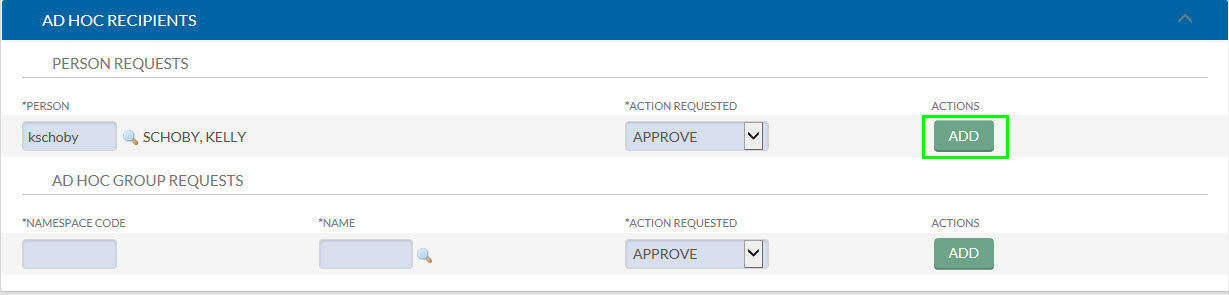
- Enter the Last Name of the person you want to send an Ad Hoc request to, then select the Search button. Once you find the correct person, select the Return Value link.
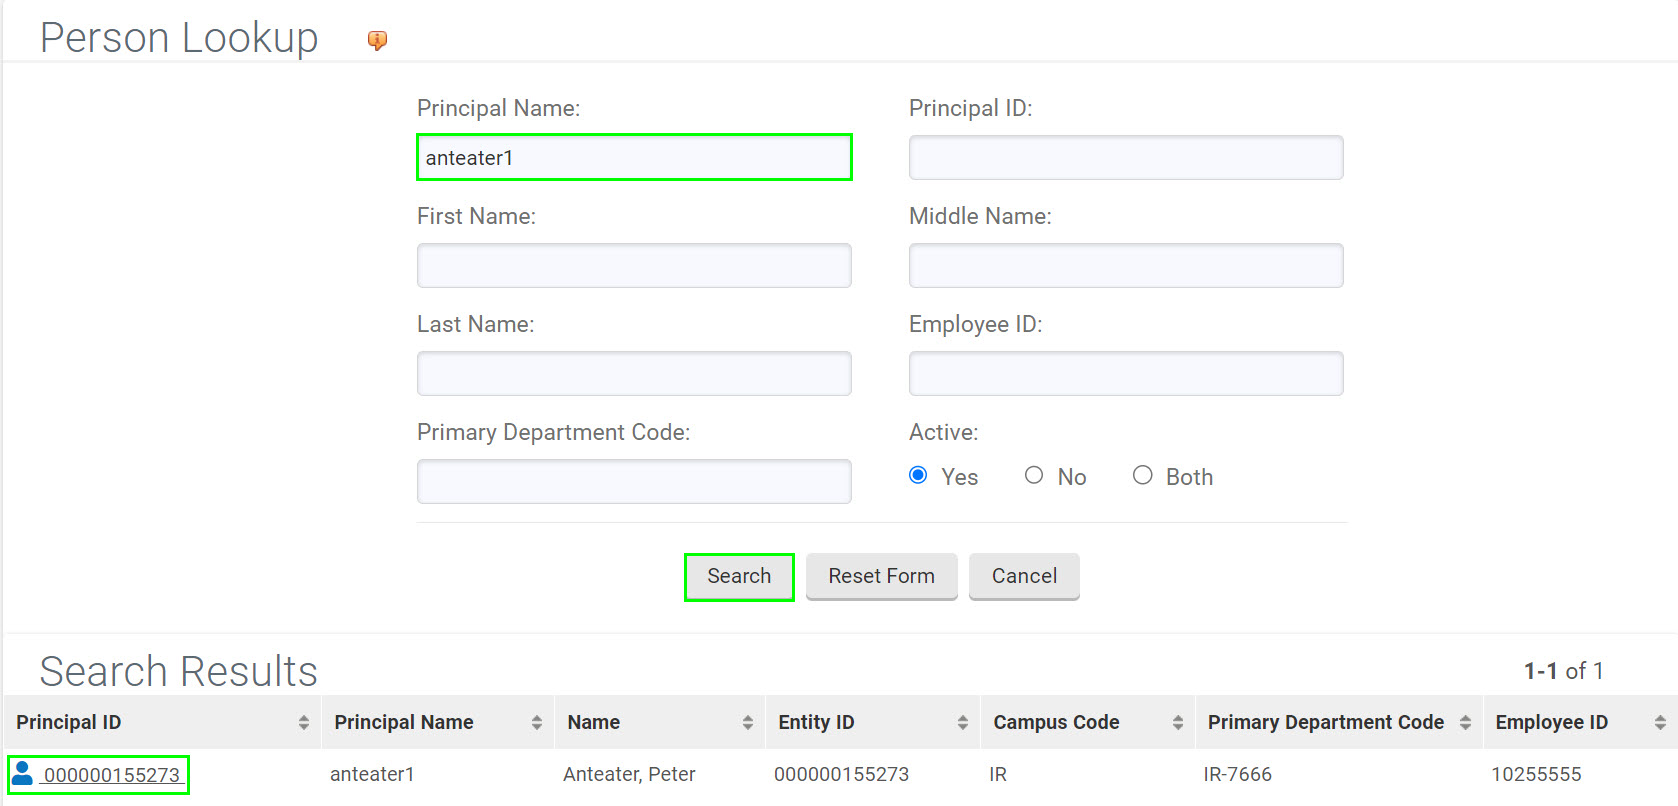
- Select the Add button
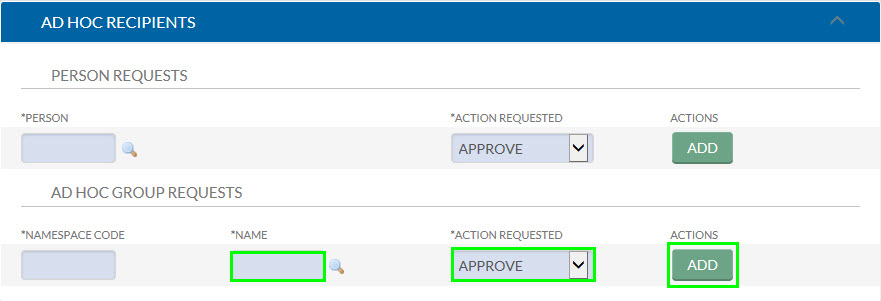
Ad Hoc Group Requests
Users can add a group to the routing of the document by entering the group name and selecting the add buttons.
Adding someone who was not originally on the electronic workflow could potentially hold up a TR eDoc. However, this additional approval step can be used for TRs that require Exceptional Approval authority. Department/Unit Users should check with their Unit managers/directors to see if their "exceptional approver" is using KFS. Users can include a signed/certified exceptional approval with their original supporting documents in the Image Scanning Tab.
Reports Tab
Once the document is completed and saved. You will have access to the Non-Employee form in the Reports tab.

Creating Multiple TRs for the Same Trip
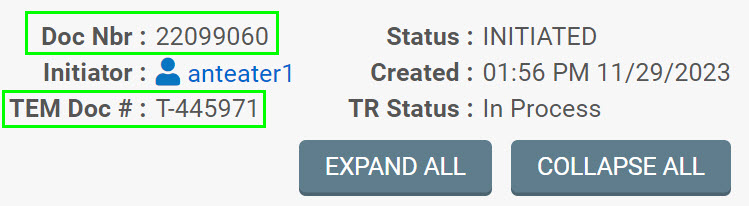
The TEM Doc Number can be used to tie two or more reimbursements for the same trip together. Once the Status of a TR is Final, a new TR can be created with the same TEM Doc Number.

Example:
A Traveler has paid for their airfare and hotel for an upcoming trip. Their Arranger can process a reimbursement prior to the trip. When the Traveler returns with meal and taxi expenses from the trip their arranger can process a second reimbursement with the same trip number as the first reimbursement as long as the first reimbursement is "Final" Status. If the processor needs to find all reimbursements for a particular trip, they can search using the TEM document number. Take note of the TEM Doc #: T154009
- Step 1: Select the Travel Reimbursement Custom Document Search link in the Travel and Event Management portlet. Select the Travel Reimbursement link.
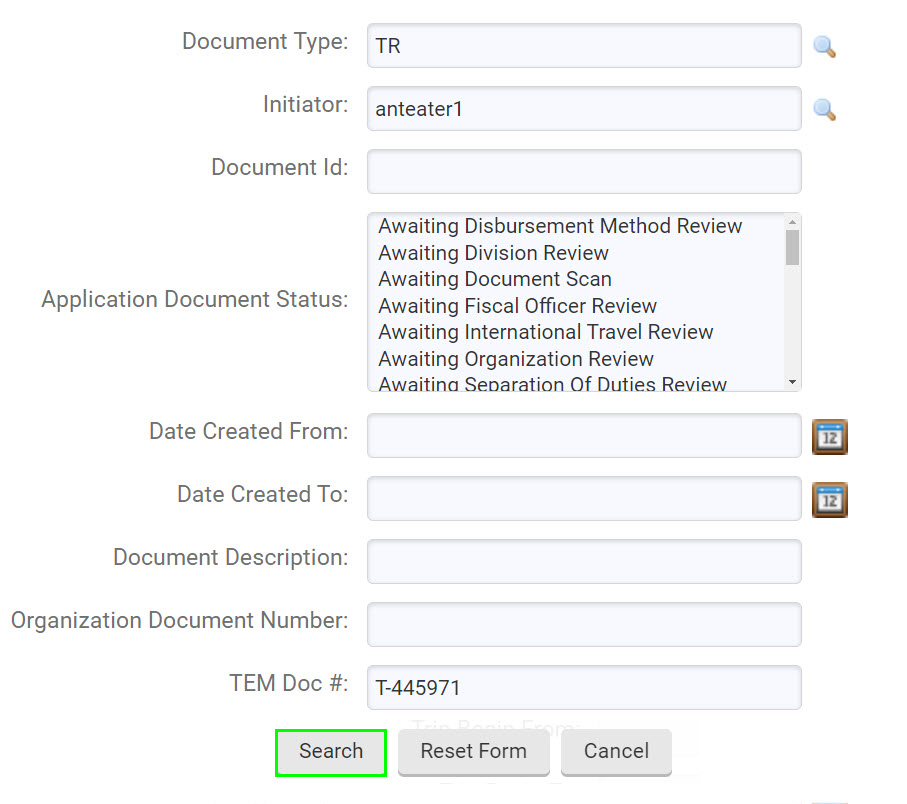
- Step 2: Enter the TEM Doc Number of the first reimbursement.

- Step 3: Select the New Reimbursement link for the Final TR.

- Step 4: A new document will open with the same TEM Doc Number as the first TR. Remove any expenses that were paid on the previous TR and add the remaining expenses. Once all required information has been entered, save and submit the document.
If the new reimbursement has been created without following the steps above, the first document number can be entered into the View Related Documents Tab. This will create a link to the first reimbursement.
- Enter the Related Document Number
- Enter the Description
- Select the add button
